Perfect Panel
Let your SMM panel's buyers top up their balance, credited on your panel automatically.
If your SMM panel runs on Perfect Panel, your buyers can top up their panel balance with 402pay: in crypto, or any other way to pay your checkout offers. When a top-up is paid, 402pay adds it to the buyer's balance on your panel by itself. There's nothing to install: you copy two pieces of code from the dashboard into your panel's settings, and that's it.
How it works
- Your panel (Add funds, 402pay) → Top-up page (username and amount)
- Top-up page (username and amount) → Pay page (the buyer pays)
- Pay page (the buyer pays) → Balance credited (on your panel)
You'll need your Perfect Panel account (to create a key), your panel's admin area, and a 402pay account. It takes about ten minutes. In the dashboard, Settings, then Perfect Panel, walks you through the same four steps as this guide, with the code to paste ready to copy.
Before you start: create an Admin API key
402pay uses an Admin API key to look buyers up on your panel and add their balance. You create it on Perfect Panel's own site, not in your panel's admin area.
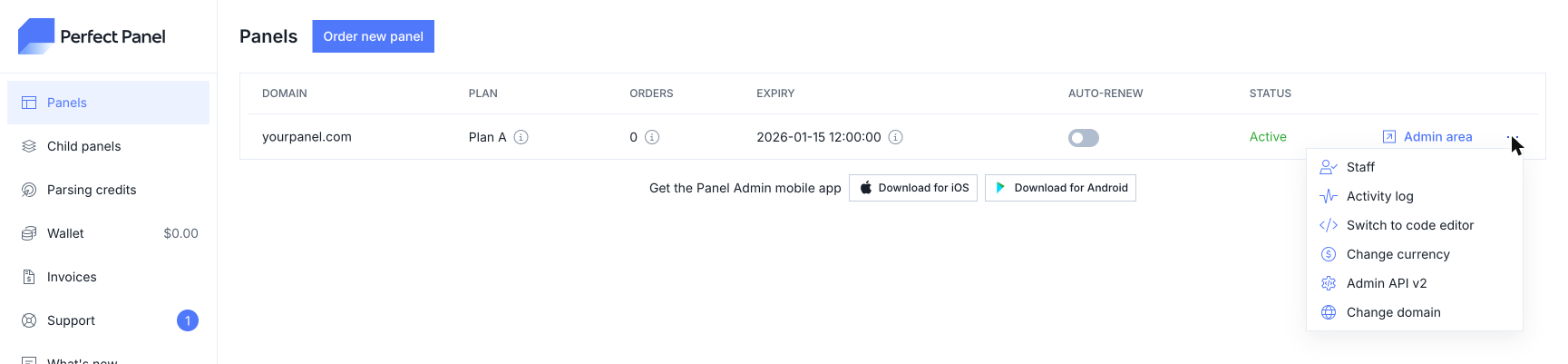
- Sign in at my.perfectpanel.com and open Panels.
- In your panel's row, open the menu (…) at the end of the row and choose Admin API v2.
- Choose Create new API key and give it a name you'll recognize, such as "402pay".
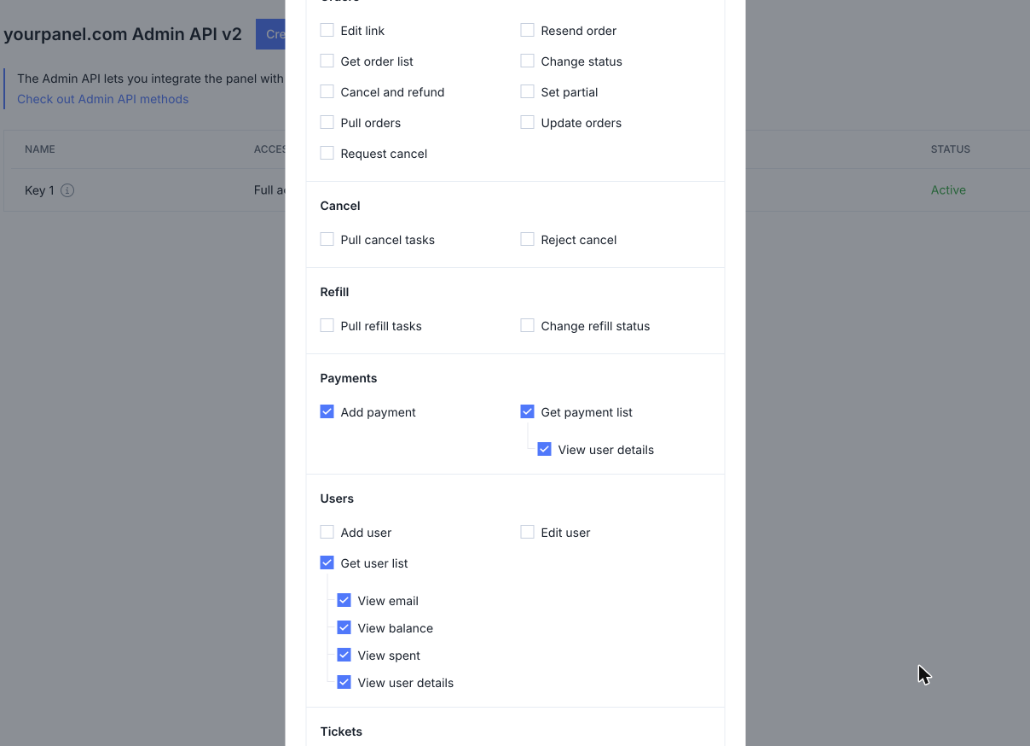
- Tick only Payments › Add payment, Payments › Get payment list and Users › Get user list. The boxes under them (View user details, View email and the rest) tick themselves; leave them as they are.
- Save, and copy the key. You'll paste it into the dashboard in the next step.
Step 1: Connect your panel
- In the dashboard, open Settings, then Perfect Panel.
- Enter your panel's address, such as
https://yourpanel.com: the address your buyers open, without/adminor any other path. - Paste the Admin API key and choose Connect panel.
402pay checks the key with your panel before it saves anything, and reads your panel's currency from it. A wrong address, a key that doesn't work or a missing permission is shown under its field, so you can fix it and try again. You don't need the payment method yet: the next step checks for it.
Step 2: Add the 402pay payment method
Buyers choose 402pay on your panel's Add funds page, so your panel needs a payment method for it. It must be of type Manual: that's the type 402pay records each top-up under on your panel.
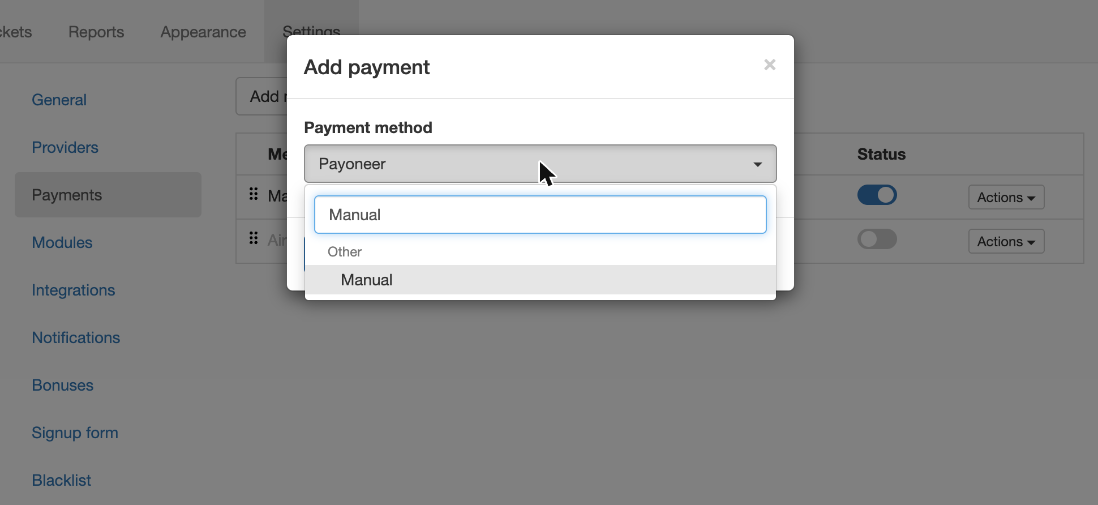
- In your panel's admin area, open Settings, then Payments, and choose Add method.
- Search for "Manual", pick it and add it.
- Open the new method. Set its Method name to "402pay": that's the name buyers see. Leave New users on Allowed so new accounts can use it too.
- In the dashboard, copy the embed code. It already holds your own top-up link, so paste it as it is.
- Back on the method, in Instruction, switch to code view with the
</>button, select anything already there, and paste the code over it. - Press
</>again to go back, then choose Save changes, and make sure the method's status is on in the list. - In the dashboard, choose Check. 402pay makes sure your panel now has a Manual method.
The embed code is the recommended one: it shows your 402pay top-up form right on your panel's Add funds page, with a link under it that opens the same page in a new tab. It looks like this, with your own link in place of the example one:
<iframe src="https://checkout.402pay.co/top-up/YOUR-CODE" width="100%" height="640" style="border:0;max-width:480px;display:block;margin:0 auto" title="Top up with 402pay"></iframe><p style="text-align:center"><a href="https://checkout.402pay.co/top-up/YOUR-CODE" target="_blank" rel="noopener noreferrer">Open the top-up page in a new tab</a></p>Prefer a button? Use the button code instead. It shows a "Top up with 402pay" button that opens your top-up page in a new tab:
<a href="https://checkout.402pay.co/top-up/YOUR-CODE" target="_blank" rel="noopener noreferrer" style="display:inline-block;padding:10px 18px;border-radius:6px;background:#10100C;color:#F7F7F4;font-weight:600;text-decoration:none">Top up with 402pay</a>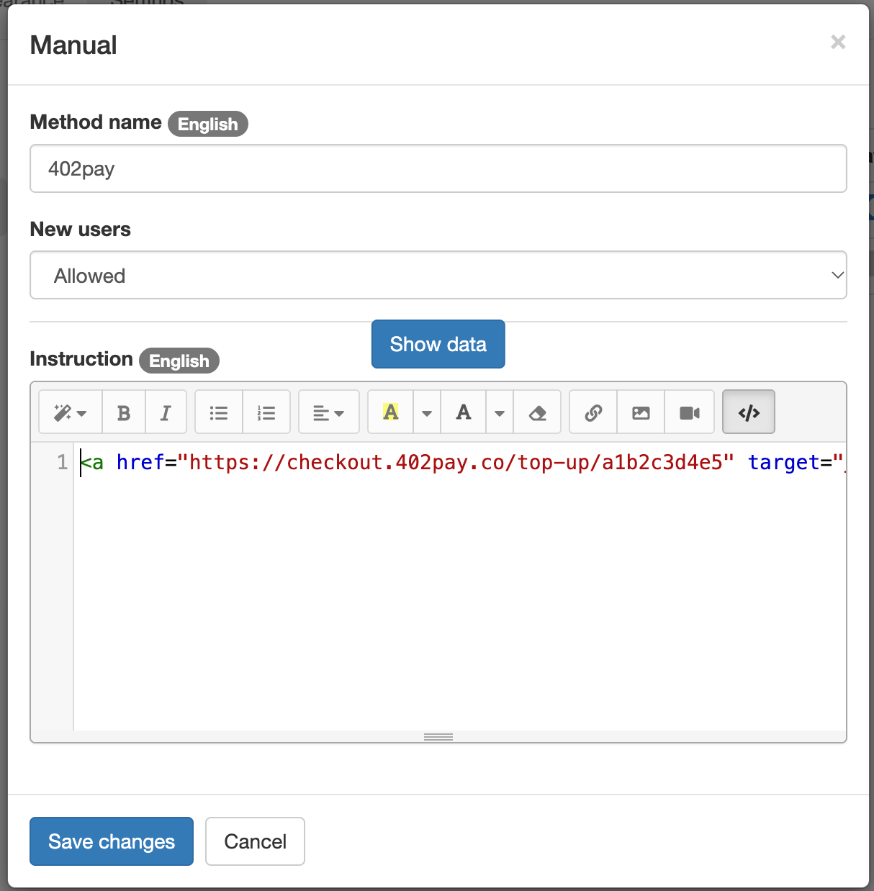
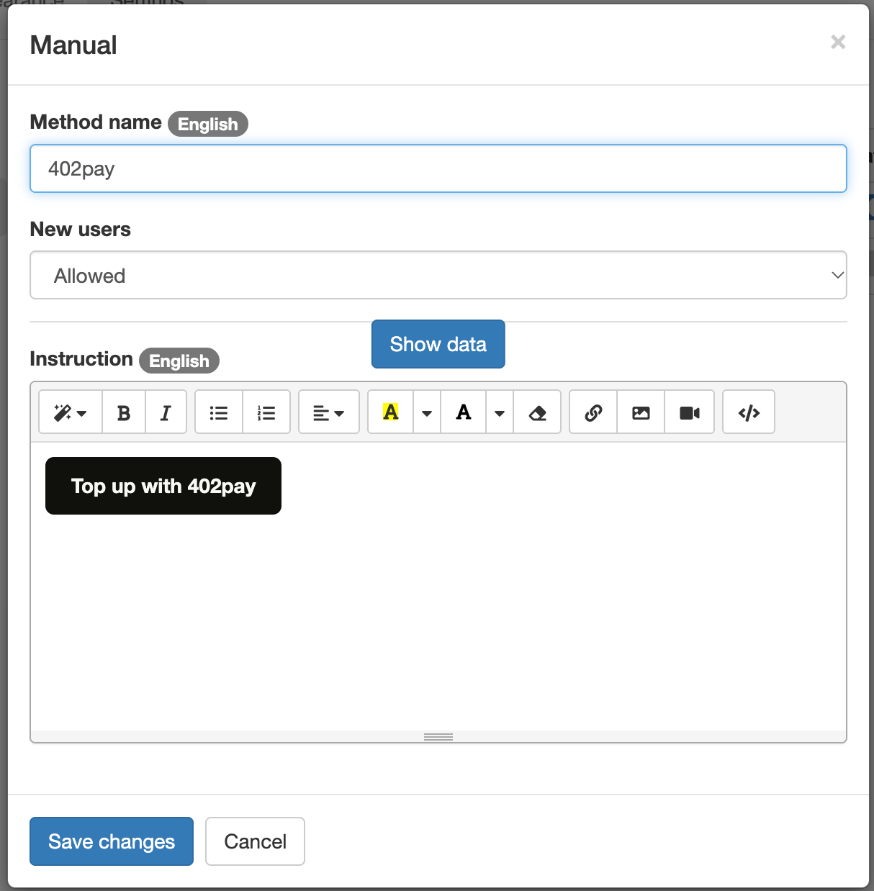
With the embed code, buyers pay without leaving your panel: the pay page and the receipt open in the same frame. Only a card partner's page opens in a new tab, and a wallet app opens as it always does. With the button code, the top-up page opens in a new tab and the payment happens there.
Step 3: Fill in the buyer's username
Recommended. Without this, buyers type their panel username on the top-up page. With it, the username is already filled in, so there's nothing to mistype.
- In the dashboard, copy the username script.
- In your panel's admin area, open Settings, then General, and find Custom footer code near the bottom.
- Paste the script there, after anything the box already holds, and save.
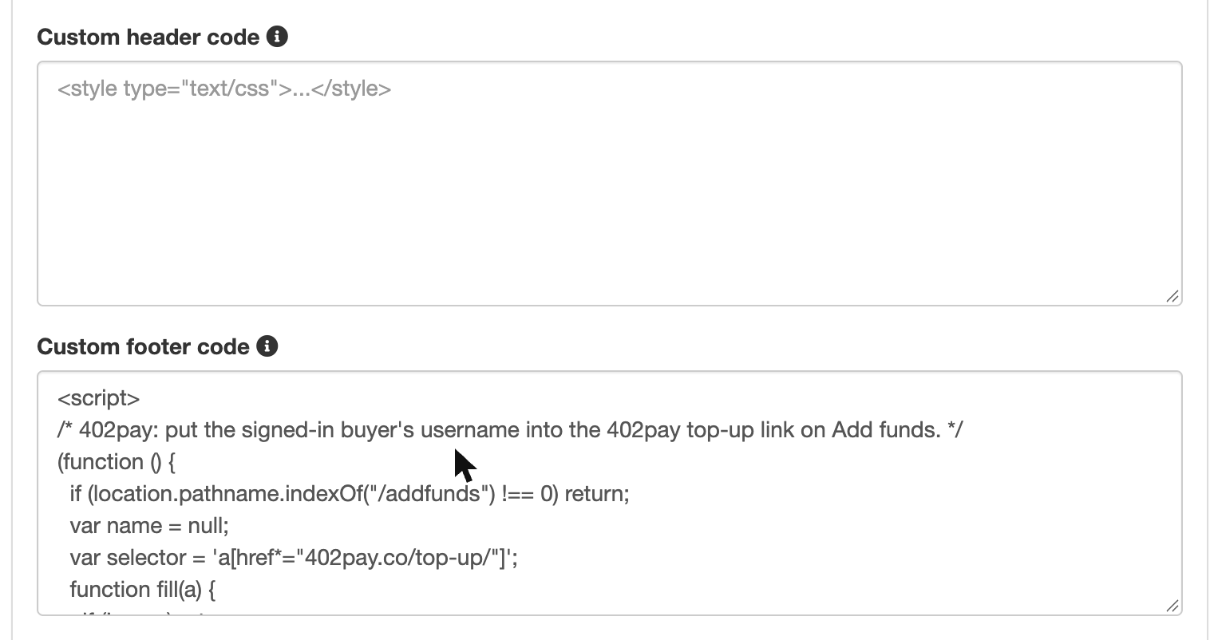
This is the whole script, so you can see what it does before you add it:
<script>/* 402pay: put the signed-in buyer's username into the 402pay top-up link or embed on Add funds. */(function () { if (location.pathname.indexOf("/addfunds") !== 0) return; var name = null; var links = 'a[href*="checkout.402pay.co/top-up/"]'; var frames = 'iframe[src*="checkout.402pay.co/top-up/"]'; function withName(href) { var url = new URL(href); url.searchParams.set("username", name); return url.toString(); } function fill(a) { if (name) a.href = withName(a.href); } fetch("/account", { credentials: "same-origin" }) .then(function (r) { return r.ok ? r.text() : ""; }) .then(function (html) { var field = new DOMParser().parseFromString(html, "text/html").querySelector("#username"); name = field && field.value ? field.value.trim() : null; if (!name) return; document.querySelectorAll(links).forEach(fill); document.querySelectorAll(frames).forEach(function (f) { var next = withName(f.src); if (f.src !== next) f.src = next; }); }); document.addEventListener("click", function (e) { var a = e.target.closest && e.target.closest(links); if (a) fill(a); }, true);})();</script>- It runs only on your panel's Add funds page, and does nothing on any other page.
- It opens your panel's own Account page in the background, as the signed-in buyer, and reads the username shown there.
- It adds that username to the 402pay embed and link, as
?username=. Nothing leaves your panel, except in that address when the embedded form loads or the buyer opens your top-up page. - If it can't find a username, for example on a theme whose Account page has no username field, the embed and link stay as they are and the buyer types it. A username is always checked against your panel before the buyer pays.
Step 4: Try it
- Sign in to your panel as a buyer, with an account of your own, and open Add funds.
- Choose "402pay" as the method. With the embed code, your top-up form shows right there, for the signed-in buyer if you added the script. With the button code, press Top up with 402pay to open it in a new tab.
- Enter an amount in your panel's currency and choose Continue. The usual pay page opens in its place; pay there. Every payment is real, so try it with a small amount.
- A moment after the payment goes through, the balance goes up. On your panel it shows as a payment with method "402pay" and the memo
402pay pmt_…, the payment's ID in 402pay.
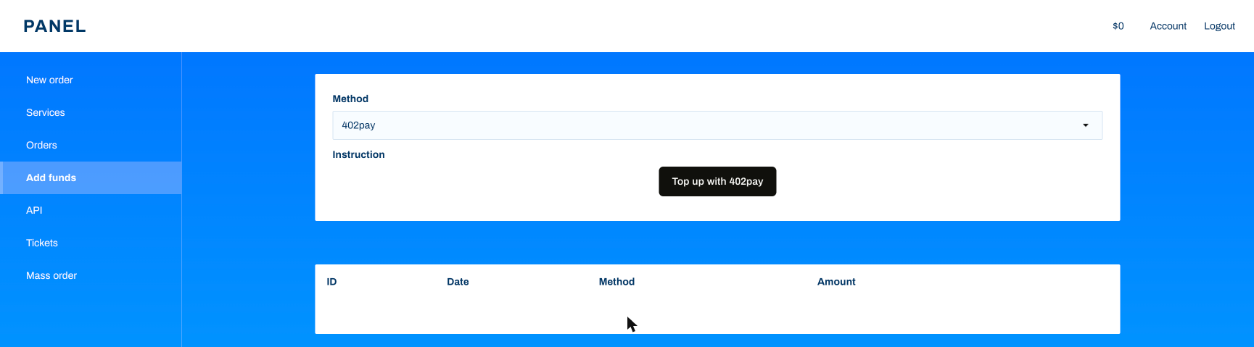
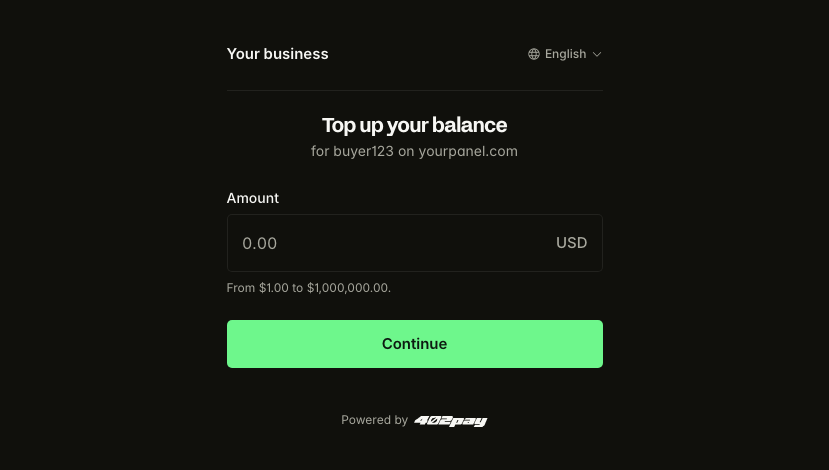
A username that isn't on your panel, or an account that isn't active, is turned away on the top-up page, before the buyer pays; the form then asks for the username. The receipt goes to the email your panel has for the buyer, so nobody is asked for one. When the payment is done, the receipt shows with a button back to your panel's Add funds page.
Fill in the top-up page from a link
Your top-up link takes these from its query string, so you can link to it from anywhere with fields already filled in, such as https://checkout.402pay.co/top-up/YOUR-CODE?username=buyer123&amount=25. Every field stays editable, and a value that can't be right is left out.
| Parameter | Fills in |
|---|---|
username | The buyer's panel username. The username script sets this one. |
amount | The amount, in your panel's currency, such as 25 or 25.50. |
email | The email for the receipt, instead of the one your panel has for the buyer. |
Top-up statuses
Settings, under Perfect Panel, lists your recent top-ups with their username, amount, status and payment.
| Status | Meaning |
|---|---|
| Awaiting payment | The buyer hasn't paid yet. They have 24 hours. |
| Crediting | Paid. The balance is being added on your panel. |
| Credited | The balance is on your panel. |
| Failed | Your panel didn't take it. The balance wasn't added. |
| Canceled | The payment expired or was canceled, so there's nothing to add. |
- A top-up fails at once when your panel refuses it: the key was deleted or lacks a permission, the Manual method is gone, or the account was removed. Fix that (Check now tells you what's wrong), then choose Retry on the top-up.
- When your panel can't be reached, 402pay keeps trying for about a day before the top-up fails.
- A balance is never added twice. Before adding one, 402pay looks for a payment with its memo on your panel, and stops if it's there.
Pause or disconnect
- Turn off Take top-ups to pause the link. Buyers who open it are told it isn't available; turn it on again whenever you like.
- Disconnect to stop for good. The link stops working at once and the saved key is deleted. Top-ups already paid are still added. If you connect again, you get a new link, so paste the new embed or button code into your payment method.
- A new address or key is checked again before it's saved.
Limits
- Your panel's currency must be one of USD, EUR, GBP, CAD and AUD.
- A top-up that's underpaid waits until it's settled: the buyer sends the rest, or you accept what arrived. See underpayments.